
How to Use an Embroidery Machine – Master Guides
Embroidery machines are excellent tools that allow you to make stunning and complex designs on fabric.
Whether you are a beginner or an experienced embroiderer, learning to use an embroidery machine can open up a world of creative possibilities.
In this article, we will guide you through using an embroidery machine, from setting it up to creating your first embroidery design. So, let’s dive in!
Embroidery machines are sophisticated devices that automate stitching intricate designs on fabric.
They offer precision, speed, and versatility, making them valuable tools for hobbyists, crafters, and professionals.
With an embroidery machine, you can embellish garments, personalize gifts, and unleash your creativity in countless ways.
Choosing the Right Embroidery Machine
Before diving into the embroidery world, selecting the proper embroidery machine for your needs is crucial.
Consider budget, embroidery area, built-in designs, and additional features like USB connectivity or computer compatibility.
Research different brands and models read reviews, and compare specifications to make an informed decision.
My observations and experiences in my own words ⬇⬇⬇:
Barry Allen
So, you’re thinking about stepping into the world of embroidery? Awesome choice! But before we dive into the fun stuff, let’s talk about something crucial: choosing the proper embroidery machine.
I remember trying to figure out which machine would suit me best when I was in your shoes. It can be overwhelming, but don’t worry; I’ve got your back.
First things first, consider your budget. Trust me, embroidery machines come in all price ranges, so knowing how much you’re willing to spend is essential.
Next up, think about the size of the embroidery area. You want to avoid ending up with a machine that can handle the size of your projects, right?
Oh, and remember built-in designs! Some machines come with many pre-loaded patterns, while others allow you to upload your own. It’s all about what works best for you.
And hey, if you’re tech-savvy like me, you should look into features like USB connectivity or computer compatibility. They can take your embroidery game to the next level.
So, research, read some reviews, and compare different models. Trust me, putting in the time now will save you a lot of hassle later. Happy hunting!
Setting Up Your Embroidery Machine
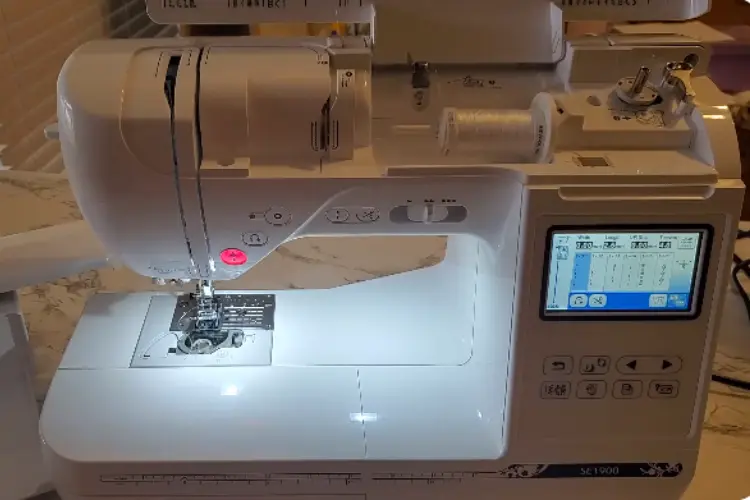
Once you have chosen your embroidery machine, it’s time to set it up. Start by carefully unpacking the device and reading the user manual.
Familiarize yourself with the different parts and accessories. Plug in the machine, connect any necessary cables, and ensure it is on a stable surface.
Install any required software or updates as per the manufacturer’s instructions.
My observations and experiences in my own words ⬇⬇⬇:
Barry Allen
Alright, you’ve picked out your shiny new embroidery machine – exciting times ahead! Now, let’s get this baby set up and ready to roll.
First things first, carefully unpack that beauty. Trust me, you don’t want to damage anything in your excitement accidentally. Once it’s out of the box, grab that user manual. Manuals aren’t the most thrilling read, but they’re packed with essential info.
Take a moment to get familiar with all the bits and bobs. You’ve reached your hoops, needles, and bobbin case – it’s like a mini sewing universe in there!
Now, let’s get this bad boy plugged in. Find a nice, stable surface for your machine; you don’t want it wobbling around while you work. Once it’s in place, connect any cables or cords as instructed in the manual. Safety first, folks!
Oh, and remember the software. Depending on your machine, you might need to install fancy programs or updates. Follow the manufacturer’s instructions, and you’ll be ready.
Phew, setting up wasn’t so bad. Now, take a step back, admire your handiwork, and prepare to bring your embroidery dreams to life!
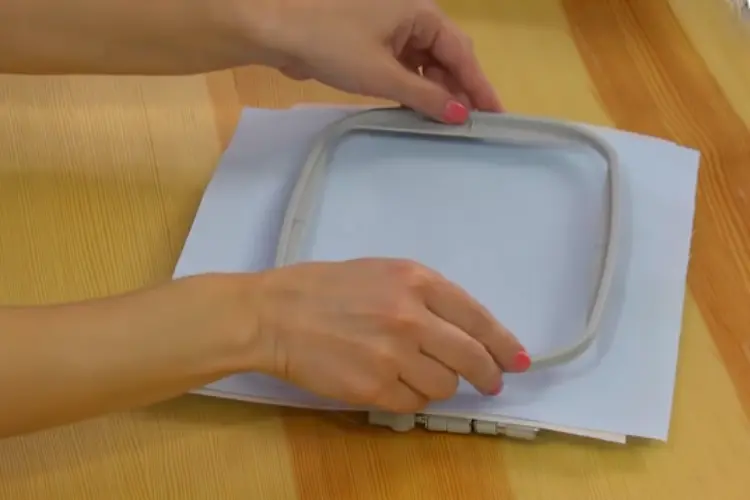
Preparing the Fabric and Hoop
Preparing the fabric and hoop is a crucial step to ensure smooth embroidery.
Please choose a fabric suitable for embroidery, such as cotton or linen, and prewash it to remove any sizing or chemicals.
Iron the fabric to remove wrinkles and place it in an embroidery hoop, ensuring it is taut but not stretched. This creates a stable surface for the machine to stitch on.
My observations and experiences in my own words ⬇⬇⬇:
Barry Allen
Ah, the fabric and hoop – where the magic begins! Getting this step right sets the stage for smooth-sailing embroidery.
First things first, let’s talk about fabric. Think cotton or linen if you want to choose something begging to be embroidered. But here’s the kicker: give it an excellent prewash to banish any sizing or chemicals. We want our fabric clean and ready to shine.
Now, let’s tackle those pesky wrinkles. Grab your trusty iron and give your fabric a once-over. Smooth as silk, right? Wrinkles might seem no big deal, but trust me, they can mess with your embroidery game.
Time to bust out the hoop! Place your fabric in there, making sure it’s nice and taut. You want it snug but not so tight; it’s practically screaming for mercy. A little tension goes a long way in creating a stable surface for your machine to work its magic on.
And there you have it – fabric and hoop, prepped and ready for action. Now sit back, relax, and let’s get stitching!
Related: How To Thread An Embroidery Needle (Step By Step)
Selecting and Editing Designs
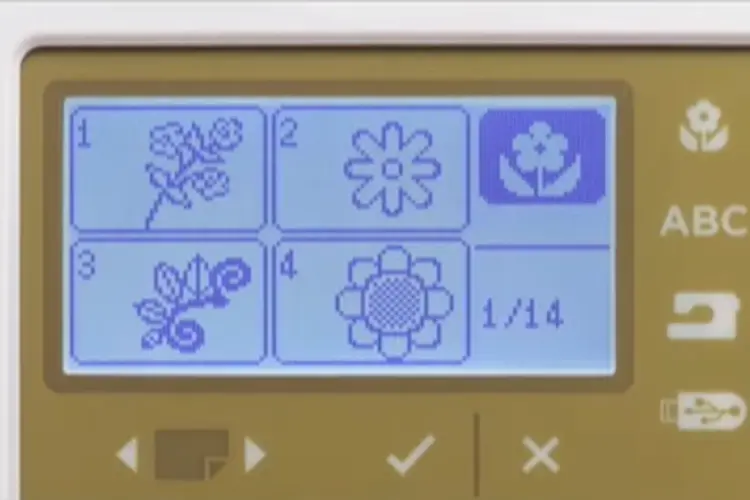
Embroidery machines offer a wide range of built-in designs and may allow you to import formats from external sources.
Browse through the available designs and select one that suits your project.
You can edit the design using the machine’s built-in editing features if needed. Adjust the size, rotation, or color scheme to match your vision.
My observations and experiences in my own words ⬇⬇⬇:
Barry Allen
Now comes the fun part – selecting and tweaking those gorgeous designs! Embroidery machines are like treasure troves, packed with built-in patterns and sometimes even allowing you to import your creations.
First off, take a peek at the built-in designs. Trust me, you’ll be spoilt for choice! Browse through them until you find the perfect match for your project. There’s something for everyone: flowers, animals, or geometric shapes.
But wait, there’s more! You can even put your spin on things with the machine’s editing features. Do you want to resize that butterfly or rotate that flower? No problem! It’s like being your embroidery designer.
So, play with colors, sizes, and rotations until your design perfectly matches your vision. Don’t be afraid to get creative – this is your time to shine!
With your design locked in and ready to go, it’s time to move on to the next step. Get ready to watch your masterpiece come to life!
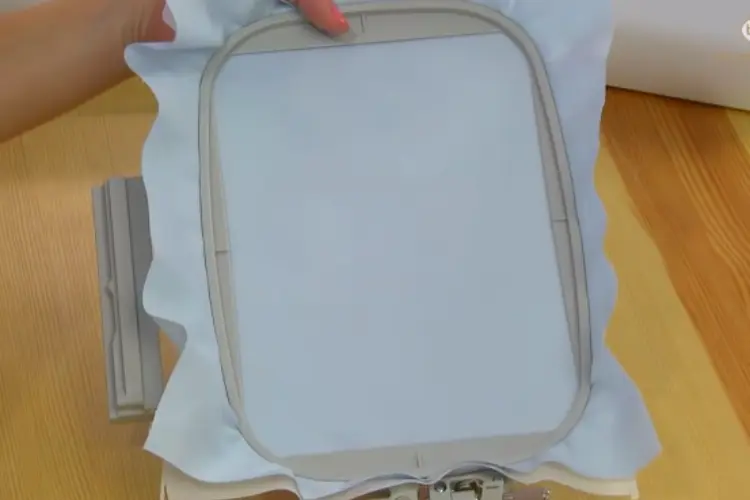
Hooping the Fabric
Once you have selected and edited your design, it’s time to hoop the fabric.
Loosen the hoop’s screw and place the fabric on the lower circle, ensuring the design area is centered.
Press the upper hoop onto the fabric, sandwiching it between the two rounds.
Tense the screw to attach the material in place, ensuring it remains taut throughout the embroidery process.
My observations and experiences in my own words ⬇⬇⬇:
Barry Allen
We’ve got our design all set and ready to go – now let’s get that fabric hooped up!
First things first, loosen up that hoop’s screw. We want it to be friendly and open for easy fabric placement. Now, lay your fabric on the lower circle of the hoop, ensuring the area where you want your design is smack in the center. Precision is key here!
Next up, grab the upper hoop and press it down firmly onto the fabric, sandwiching it snugly between the two rounds. It’s like making a little fabric sandwich – delicious, right?
Once everything’s in place, it’s time to tighten that screw. Please give it a good twist to secure the fabric, ensuring it stays nice and taut throughout the embroidery process. We don’t want any loosey-goosey fabric messing up our masterpiece!
And there you have it – fabric hooped and ready to rock! Now, onto the next step, where the real magic happens. Get ready to watch your design come to life before your very eyes!
Related: How to Remove Embroidery From Backpack
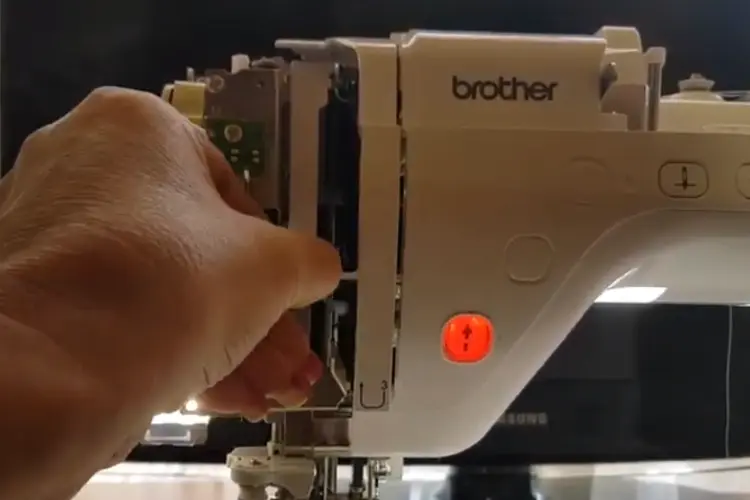
Embroidery Machine Settings

Before starting the embroidery, review and adjust the settings on your embroidery machine.
Set the desired thread color, stitch density, and other relevant parameters based on your design and fabric.
Guide to the user manual for directions on the exact settings and options available on your machine.
Take your time to ensure the settings are accurately configured to achieve the desired outcome.
My observations and experiences in my own words ⬇⬇⬇:
Barry Allen
We’re almost there, but before we dive into the embroidery fun, let’s talk about settings.
First, let’s review and tweak those machine settings to perfection. This is where the magic happens, so pay close attention!
Start by setting your desired thread color. Whether you’re feeling bold with bright hues or sticking to classic neutrals, ensure you’ve got the right color ready.
Next up is stitch density, which determines how closely together those stitches will be. It’s all about finding the sweet spot for your design and fabric. It’s too dense, and it might pucker. It needs to be more loose, and it might look sparse. Experimentation might be required here!
Remember other relevant parameters like stitch type, length, and unique settings your machine offers. Each little tweak can make a big difference in the final result.
Are you feeling overwhelmed? Don’t worry; your trusty user manual is here to save the day. Flip through it for guidance on adjusting your specific machine’s settings. Remember, there’s no rush – take your time to get everything right.
You’re ready to rock and roll once those settings are dialed in! I’m glad to see your design come to life in stitches – it will be epic!
Starting the Embroidery
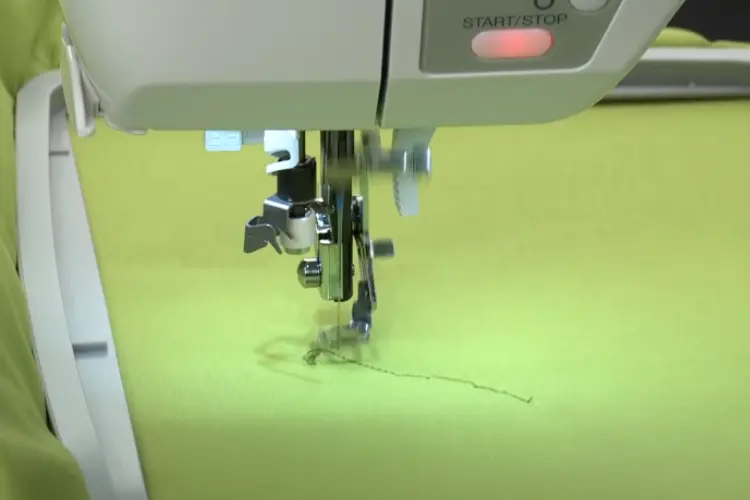
You can start embroidering with the fabric hooped and the machine settings in place.
Position the hoop under the machine’s needle, ensuring it is aligned with the design area.
Lower the needle into the fabric using the machine’s controls and double-check the placement before beginning.
Some machines may offer a “trace” feature that allows you to preview the design’s positioning.
My observations and experiences in my own words ⬇⬇⬇:
Barry Allen
Alright, buckle up – it’s time to bring that design to life!
With your fabric hooped up, and the machine settings dialed in, we’re ready to dive into the embroidery adventure.
First things first, position that hoop under the machine’s needle. Precision is critical here, so ensure it’s aligned perfectly with the design area. We want every stitch to land precisely where it’s supposed to.
Using the machine’s controls, lower the needle into the fabric. Take a moment to double-check the placement – we want to start on the right foot!
Some machines offer a nifty little feature called “trace.” It’s like a sneak peek of what’s to come – allowing you to preview the design’s positioning before you commit. If your machine has this option, take advantage of it – it can save you from any last-minute surprises!
With everything lined up and ready to go, it’s time to press that start button and watch the magic happen. Be amazed as your design takes shape, one stitch at a time. Let the embroidery adventure begin!
Related: Tips to Select Fabric Shredder for Home Use
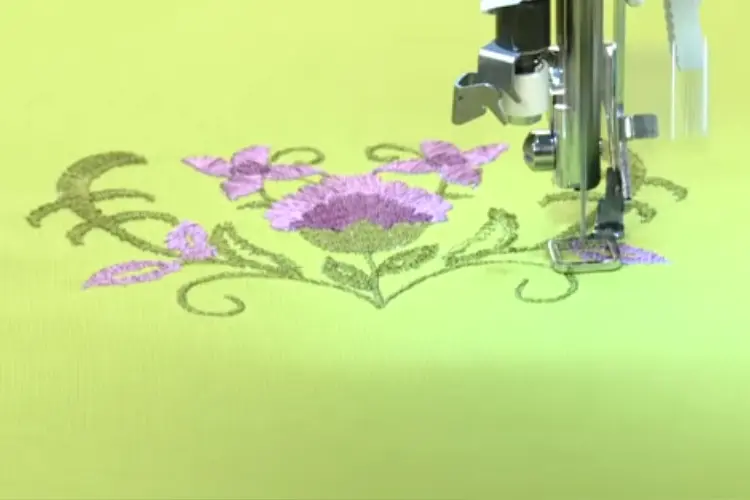
Monitoring the Embroidery Process
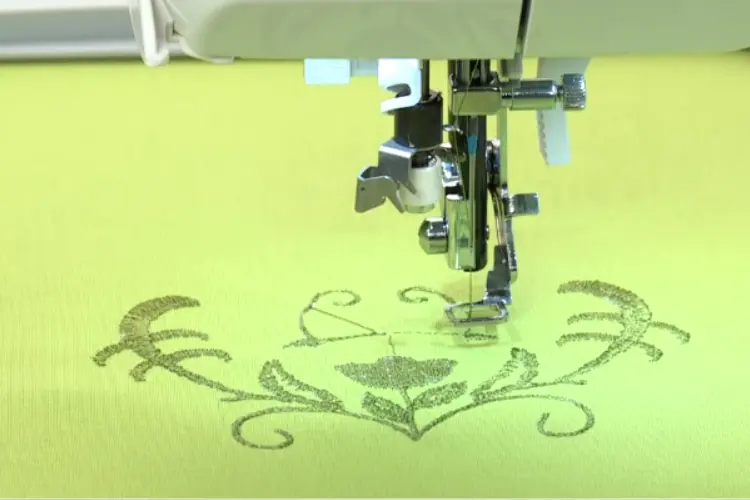
While the embroidery machine works its magic, keeping an eye on the process is essential.
Watch for any thread breakage, tension issues, or fabric bunching. Be prepared to pause or stop the machine if necessary.
Stay near the machine and periodically check the progress to ensure everything runs smoothly.
This allows you to manage any problems promptly and control possible errors.
My observations and experiences in my own words ⬇⬇⬇:
Barry Allen
Alright, now that we’ve kicked off the embroidery party, it’s time to play the role of the vigilant overseer. While the machine works its magic, keeping a close eye on the process is crucial.
First things first, keep watch for any signs of trouble. If you notice any thread breakage, tension issues, or fabric bunching, it’s time to spring into action. Don’t hesitate to pause or stop the machine if necessary – better safe than sorry!
Stay close to the machine, my friend. Periodically check the progress to ensure everything’s running as smoothly as silk. This way, you can nip any problems in the bud before they spiral out of control.
Remember, you’re the captain of this embroidery ship, and it’s up to you to steer it clear of any rocky waters. So keep those eyes peeled, stay alert, and be ready to tackle any challenges that come your way. You’ve got this!
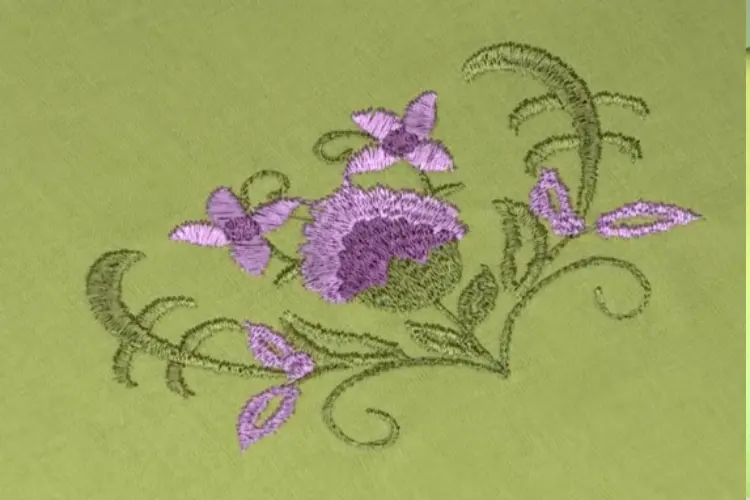
Finishing and Removing the Embroidery
Once the embroidery is complete, it’s time to remove the fabric from the hoop and finish the design.
Carefully loosen the hoop’s screw and gently remove the fabric from the ring, taking care not to damage the stitches.
Trim any excess threads and inspect the embroidery for loose lines or imperfections. Give the fabric a final press to remove any creases or hoop marks.
My observations and experiences in my own words ⬇⬇⬇:
Barry Allen
We’re in the home stretch now – it’s time to finish our masterpiece!
Once the embroidery is complete, it’s time to remove the fabric from the hoop gently. Carefully loosen that trusty screw and gently take the fabric out of the ring. We’ve put so much work into those stitches; we want to avoid accidentally damaging them now!
As you remove the fabric, take a moment to admire your handiwork. Look out for loose threads or imperfections – now’s the time to tidy things up. Grab those scissors and trim away any excess threads, ensuring your design looks crisp and clean.
Once everything’s looking picture-perfect, give the fabric a final press. This will help smooth any creases or hoop marks, making your embroidery professional.
And there you have it – a finished embroidery ready to be admired by everyone. Step back, soak in that sense of accomplishment, and prepare to show your beautiful creation to the world!
Related: 12 Common Janome 9450 Problems With Fast Solutions
Troubleshooting Common Issues
Embroidery machines can sometimes encounter common issues during the stitching process.
Some common problems include thread breakage, misalignment, or fabric puckering. Refer to the troubleshooting section in your machine’s manual for specific solutions to these issues.
Understanding how to troubleshoot common problems will help you overcome challenges and achieve better results.
Tips for Successful Embroidery
To enhance your embroidery skills and achieve excellent results, here are some helpful tips:
- Use high-quality embroidery threads.
- Experiment with different fabrics and stabilizers.
- Clean your machine regularly to prevent lint buildup.
- Practice on scrap fabric before working on your main project.
- Take breaks during long embroidery sessions to avoid overheating.
Maintaining Your Embroidery Machine
Properly maintaining your embroidery machine is essential to keep it in optimal condition.
Follow the manufacturer’s guidelines for routine cleaning and oiling. Keep the machine covered to protect it from dust and debris when not in use.
Regularly check and replace needles, bobbins, and other consumables. By maintaining your machine, you ensure its longevity and consistent performance.
Related: How to Shorten a Dress Without Sewing – 13 Working Methods
Exploring Advanced Techniques
Once you have mastered the basics of an embroidery machine, you can explore advanced techniques to expand your creative repertoire.
Some advanced techniques include appliqué embroidery, monogramming, free-motion embroidery, and combining multiple design elements.
Attend workshops or join online communities to learn from experienced embroiderers and discover new techniques.
Conclusion
Embroidery machines offer endless possibilities for creating stunning designs on fabric.
Following the actions outlined in this writing, you can confidently use an embroidery machine to bring your creative visions to life.
Remember to choose the suitable machine, set it up correctly, prepare your fabric, select and edit designs, and carefully monitor the embroidery process.
With practice, patience, and a passion for embroidery, you can master this art form and enjoy the satisfaction of creating unique and personalized pieces.
Check related shorts on the City Crews Studio YouTube channel:
Frequently Asked Questions “FAQs”
While embroidery machines can work with various fabrics, choosing materials suitable for embroidery is essential. Fabrics like cotton, linen, and denim are commonly used and provide good results. Avoid overly stretchy or delicate fabrics, which may pose challenges during embroidery.
The time it takes to learn how to use an embroidery machine can vary depending on your experience and dedication. With regular practice and patience, you can become proficient in using the device within a few weeks or months. Start with easy designs and slowly function up to more complex tasks.
You can create embroidery designs using specialized software or digitizing programs. These programs allow you to convert images or artwork into stitch files that the embroidery machine can read. Learning to digitize your designs opens up endless possibilities for customization and personalization.
Regularly maintaining and cleaning your embroidery machine are essential for its smooth operation. If you use it frequently, clean the machine after every project or at least once a month. Remove lint, dust, and any thread remnants from the device. Refer to the user manual for specific cleaning instructions for your model.
Many people use embroidery machines for commercial purposes, such as starting an embroidery business or offering personalized services. However, checking the regulations and requirements in your specific region or country regarding licensing, copyright, and other legal aspects of running a commercial embroidery venture is essential.